What is imposition? Mastering the "Booklet Printing" function
平田提When you're making a zine, you might come across the term "imposition." This happens when submitting to a printing company or when trying to print and bind it yourself. Knowing how imposition works can make the submission process much smoother.
What is imposition?
Imposition is the process of efficiently arranging multiple pages onto a single sheet of paper for printing.
Printing companies print pages all at once on large sheets of paper, such as A0 or B0, then fold, bind, and trim them. This process of deciding "which page goes where on a single sheet of paper" is called imposition.

For example, if you're making a 16-page saddle-stitched booklet (A5 finished size) by folding A4 paper once, you would prepare four sheets of A4 paper and stack them. In this case, page 16 would be on the back of the cover (page 1), and pages 2 and 15 would be next to each other on the back of that, and so on. You need to arrange them so that the page order is correct when folded.
*The arrangement shown above is called "reader's spreads."
For submission, create data as single pages or reader's spreads.
Knowing how imposition works, you might think, "Shouldn't I create the data as imposed spreads then?" However, for ease of submission, we recommend creating your data as single pages or reader's spreads without imposition.
*If you are submitting to a printing company, they will handle the imposition themselves.

If you create data as imposed spreads, it will be cumbersome to add pages or change their order later. With single pages, you can easily make revisions to each page, offering more flexibility. Also, most printing companies accept submissions as single pages or reader's spreads and will impose them internally.

While the number of pages in a booklet is a multiple of four, the number of pages for submission data is specified as the total number of pages, including "body + 4 cover pages." For example, for a 32-page body, it is common to specify "36 pages" by adding the 4 cover pages (please check with the printing company's website).
When is imposition necessary?
You need to consider imposition in the following cases:
When you want to do a test print and check it yourself
Once you've created your zine data in Canva or InDesign, it's highly recommended to do multiple test prints. You'll likely notice issues faster when you print them out than when viewing them on screen, such as bleed, font embedding status, font size, image resolution, and so on.
*It's also recommended to use convenience store printing services to check if it prints correctly in environments other than your own.
You only need to do the imposition yourself when you print and bind it yourself. This is because if you print the data in sequential page order as is, the page order will be jumbled when bound.
When printing and binding with a Risograph or similar
Risograph, a stencil duplicator, is popular for its distinctive texture, unique ink bleed, and choice of colors. However, if you are printing and binding with a Risograph yourself rather than outsourcing, you will need to impose the pages. Typically, Risographs print on paper up to A3 size. After printing, you fold or trim the paper, then collate, fold, and stack it for binding. If you're making an A4 to A5 size zine, you'd impose two pages on one side and two pages on the back. Once 100 copies of one side are printed, you flip the paper over, set it, and print the next two pages, and so on.
*When flipping the paper, make sure to check whether it's short-edge binding or long-edge binding.
*At this point, having a "dummy book" (described below) can help prevent printing errors.
Since the Risograph plate is A3, imposing and printing on A3 and then folding is the most cost-effective method. You can either cut the A3 paper once and bind it, or impose multiple pages on A3 to create A5 size pages. In that case, it's best to create a dummy book and check it thoroughly before preparing your data.

Using Adobe Acrobat's "Booklet Printing" feature
If you open a PDF created as single pages in Adobe Acrobat (or Adobe Reader) and click "Booklet" in the print dialog, it will automatically impose the pages for saddle-stitching. If your printer supports duplex printing, simply select "Print on both sides." If not, you'll print in two stages: "Print on one side (front)" then flip the paper and "Print on one side (back)."
Stack the printed sheets, fold them in half, and staple the crease, and you'll have a saddle-stitched booklet with imposed pages. Very convenient, isn't it?
By the way, if you select "Adobe PDF" in the printer selection field here, you can save the imposed PDF.
On Windows, open the print dialog with Ctrl+P, and on Mac, with Command+P, then select "Booklet." For "Two-sided printing," choose "Right" for vertical text or "Left" for horizontal text.

Furthermore, with the paid version, Adobe Acrobat's "Organize Pages" feature allows you to manually change the page order for imposition. If an AI PDF editing function is available (which may sometimes require installing add-ons), you can simply drop in the file and ask the AI to handle the imposition.
In Adobe InDesign, you can print a booklet by going to File > Print Booklet. Make sure to check "Print blank pages" in the "Print Settings" to ensure the page order remains consistent.
・Related article: Choosing the best app for making a zine
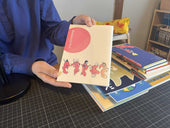
If you're binding it yourself, create a dummy book
If you're printing and saddle-stitching your zine yourself, you'll need to arrange the data according to the imposition order beforehand. This is where a "dummy book" (tsukami-hon) comes in handy.
*The original meaning of "dummy book" refers to a book bound with the same paper and specifications as the final product. Here, we're using the term for convenience.

Making a dummy book is simple. Take "number of pages to print ÷ 4" sheets of paper, stack them, and fold them (don't bind). For example, for 32 pages, use 8 sheets. Write the page numbers (folios) on them while stacked, then open them one by one. You'll immediately see which pages appear next to each other and on the front/back of the same sheet of paper.
*When printing with a Risograph yourself, this dummy book becomes a reliable companion. It helps prevent getting lost on which page is on the back of which.
Summary
Instead of manually figuring out imposition after printing, utilizing the features and tools introduced here will save you a lot of time. Please make use of them! I've even heard that professional printing companies sometimes use handwritten dummy books for confirmation. Try it out with test prints and hands-on creation!
Before submitting or designing, please also check the bleed settings.
・Related article: What is bleed?